Just got back from the HSNW Spring Stamp Festival at Port Sunlight on the Wirral - what a great afternoon!! It was a crafter's paradise - lots of stalls, lots of demos & lots of goodies to buy!!
I bought a gorgeous pink bag at the Glitter Girls stall (I know - yet another bag for my collection!!), a funky pink storage box, quite a few stamps & some other bits & bobs.
The next one's in October - can't wait!!
Shirley
Saturday, 9 May 2009


Saturday, 2 May 2009
Golden Oldies!


Some more cards using items from the new Mini Stampin' Up! Catalogue - this time using the Golden Oldies set. All images were watercoloured using SU's Watercolour Wonder crayons & have been mounted on the new Washington Apple DSP.
I've used the faux stitching technique on the 1st card, plus some of the new designer buttons. The 2nd card is very simple, just mounting the image & creating a scalloped border using the Scallop Edge punch. I created the playing cards on the 3rd card using Sizzix Sizzlits - not sure of the name of the set, but it's the one with the playing cards & gaming chips.
It's nice to be able to add a touch of humour to cards!
Fresh Cut Notes

I love the new Fresh-Cut Notes from Stampin' Up! I made this card using the Fresh Cuts stamp set, which I think is gorgeous. I used the card as a stencil on the back of the envelope & sponge-daubed the flower with inks - this made the envelope match the card & also added some soft definition to the flower in the front of the card.
Loads of Love Card

Here's a card I made a while ago using Stampin' Up!s Loads of Love stamp set & the Tailgaiting wheel. I chose a colour scheme that would suit a man's card.
Cards With Movement


Here's 2 of the cards we made on my Cards With Movement workshop. There are 2 others, but I don''t have photos of those yet!
The 1st card (Cheers) is a fairly simple spinner card, where the discs spin round. The 2nd card (So Very Sweet) is my favourite - the flower rolls across the aperture - it says sweet on the other side too!
Sunday, 12 April 2009
Mini Pizza Box & Cards
I've been wanting to make a mini pizza box for quite a while, but was never happy with the available templates for the box, as to me, they weren't a proper pizza box. So in the end, I decided to come up with my own template. Here's the box I came up with:


The box is 4"x4" & I made some 3.5" x 3.5" cards to fit in it.


I've also written a tutorial for the pizza box (in pdf format) & it's available here.


The box is 4"x4" & I made some 3.5" x 3.5" cards to fit in it.


I've also written a tutorial for the pizza box (in pdf format) & it's available here.
Playful Petals!

I made this card at a recent Stampin' Up! workshop. I used the brand new Playful Petals set from the mini catalogue, plus the gorgeous Tea Party DSP. I stamped the images onto coloured cardstock, added colour with the Stampin' Write pens & mounted on a Very Vanilla love note with Stampin' Dimensionals.
Wednesday, 1 April 2009
What can you do with a few papers & some envelopes?
Once a month, the Altrincham Craft Stamping Group have an all day meeting, which includes a small kit. This month, I put together what I thought was quite a good kit - it included 10 6x6 K & Co papers, a mini note pad, a mini gel pen, some C6 manilla envelopes, some buttons, brads, ribbon, a mini file clip, 3 binding rings & some pieces of thick plain card.
I decided to case a similar idea I'd seen from a US demo (sorry, I can't remember who it was) & make a mini envelope organiser. Here's what I came up with:


I decided to case a similar idea I'd seen from a US demo (sorry, I can't remember who it was) & make a mini envelope organiser. Here's what I came up with:


Thursday, 26 March 2009
OMG!!
How long is it since I last posted???!!!
After finishing the invites (thanks for the lovely comments), my laptop then decided it was going to have a mid-life crisis & constantly crashed - despite being rebuilt 3 times!! Well the 4th time seems to have worked (fingers crossed), so I'm back on line & raring to go.
It also means I haven't been able to update my website, as I lost all the software I use for that. I've now got the software back again, so looks like I'm going to be busy Sunday & Monday getting this blog & the site updated with the latest offers from Stampin' Up!
Shirley
Tuesday, 17 February 2009
Finished at Last!!!!
I haven't posted for a while as I've been very busy making 157 wedding invitations for my brother. These are no ordinary invites - each one is a mini book; the front cover has a dry embossed border (done on the Big Shot), is hand-stamped & has a hand-cut rectangle window, revealing heat-embossed silver hearts & "Invitation"; inside are 4 pages of information about the wedding & the back cover was hand-notched to hold the RSVP card. All the pages were punched using the Bind-It-All machine, then threaded with ribbon & tied in a bow. Plus I stamped my details on the back.
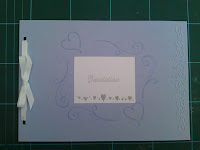


As well as doing all that, I had to print the insides, getting all the card the right way round to print on the reverse side - and there were 3 different types of "insides"!! Here's the finished product:


Some of the lettering is blurred as I didn't think my brother would appreciate me broadcasting the details of his wedding across the internet!
I took photos of each of the stages while making these, so I will post a tutorial of how to make these - you may not want to make wedding invites, but this idea could be used for lots of other things - even a mini book for Mother's Day.
Shirley
Subscribe to:
Posts (Atom)